스프링 부트 3 - 스프링으로 애플리케이션 만들기
스프링 컨테이너
스프링 컨테이너를 대표하는 인터페이스는 ApplicationContext이다. 이 인터페이스를 이용해 애플리케이션을 구성하고 있는 많은 정보(어떤 빈이 등록되었는지, 리소스에 접근 방법, 이벤트 전달 및 구독 등)를 담고있는 오브젝트들을 구현해야한다.
ApplicationContext 의 구현체 중에서 코드에 의해 손쉽게 만들 수 있는것이 GenericApplicationContext이다.
1
2
3
GenericApplicationContext applicationContext = new GenericApplicationContext(); // 컨테이너 생성
applicationContext.registerBean(HelloController.class); // 빈 등록
applicationContext.refresh(); // 컨테이너 start
이 컨테이너에 빈을 등록하기 위해 .registerBean을 사용한다. 이때 인자로 여러 종류를 넣어줄 수 있는데, 가장 대표적으로 클래스 자체를 넣어주는 방법을 사용한다.
컨테이너를 초기화하는 작업을 위해 .refresh()를 수행해준다. 이후 위임이 필요한 Bean을 얻고 싶다면 아래 코드와 같이 .getBean()을 통해 객체를 얻으면 된다.
1
HelloController helloController = applicationContext.getBean(HelloController.class);
이때 bean에 등록된 오브젝트들은 싱글톤처럼 동작한다. 즉, .getBean()을 호출할 때마다 새로운 객체(인스턴스)를 생성 후 반환하는 것이 아니라, 매번 같은 인스턴스를 반환한다. 그래서 스프링 컨테이너를 ‘싱클톤 레지스트리’ 라고도 부른다.
Dependency Injection(DI)
스프링의 주요 특징 중 하나는 Dependency Injection이다. 스프링은 추상화를 지향한다.
쉽게 말해, 어떤 클래스를 의존할 때는 직접 그 구현체 클래스를 사용하는 것이 아니라, 인터페이스를 의존하게 하는 것이다. 이렇게 함으로써 구현체가 변경되더라도 인터페이스는 변하지 않기 때문에 코드 수정을 하지 않아도 되게 된다.
물론 위 이야기는 코드 레벨에서 말하는 것이다. 실제 런타임을 위해서는 인터페이스를 구현하는 구현체 중 어느 것을 사용할지가 결정되어야 한다. 사용할 구현체를 결정해서 넣어주는 것을 ‘Dependency Injection(DI)’라고 한다.
사용할 구현체 결정은 누가 해줄까? DI에서 두 오브젝트가 동적으로 의존관계를 가지게 도와주는 존재를 Assembler(어셈블러)라고 한다. 인터페이스에 의존하기 때문에 직접 의존관계가 없는 클래스의 오브젝트들을 서로 연결시켜주고 사용할 수 있게 해주는 역할을 한다.
Spring Container는 DI를 가능하게 해주는 Assembler이다. Spring Container가 하는 역할을 정리해보자.
- 메타 정보를 바탕으로 클래스의 싱글톤 오브젝트를 만든다.
- 이 오브젝트가 의존하는 다른 오브젝트가 있다면 주입해준다.
컨트롤러가 다른 오브젝트(service)에게 위임하도록 만들고, 그 오브젝트는 DI를 통해 받을 수 있도록 코드를 작성해보자.
1
2
3
4
5
6
7
8
9
10
11
12
13
14
15
16
17
18
19
20
21
22
23
24
25
26
27
28
29
public static void main(String[] args) {
    GenericApplicationContext applicationContext = new GenericApplicationContext();
    applicationContext.registerBean(HelloController.class); // 빈 등록
    applicationContext.registerBean(SimpleHelloService.class); // 빈 등록
    applicationContext.refresh(); // 스프링 컨테이너 작동

    ServletWebServerFactory serverFactory = new TomcatServletWebServerFactory();
    WebServer webServer = serverFactory.getWebServer(servletContext -> { // 서블릿 컨테이너
      servletContext.addServlet("frontcontroller", new HttpServlet() { // 서블릿
        @Override
        protected void service(HttpServletRequest req, HttpServletResponse resp) throws ServletException, IOException {
          // 인증, 보안, 다국어, 공통 기능
          if (req.getRequestURI().equals("/hello") && req.getMethod().equals(HttpMethod.GET.name())) {
              String name = req.getParameter("name");

              HelloController helloController = applicationContext.getBean(HelloController.class);
              String ret = helloController.hello(name); // 위임

              resp.setContentType(MediaType.TEXT_PLAIN_VALUE);
              resp.getWriter().println(ret); // body
          }
          else {
              resp.setStatus(HttpStatus.NOT_FOUND.value());
          }
        }
      }).addMapping("/*");
    });
    webServer.start();
}
Service는 추상화를 위해 인터페이스를 만들고, 그 구현체를 만들자.
1
2
3
public interface HelloService {
    String sayHello(String name);
}
1
2
3
4
5
6
public class SimpleHelloService implements HelloService {
    @Override
    public String sayHello(String name) {
        return "Hello " + name;
    }
}
컨트롤러에서는 생성자로 서비스를 주입받은 후 사용한다.
1
2
3
4
5
6
7
8
9
10
11
12
public class HelloController {

    private final HelloService helloService;

    public HelloController(HelloService helloService) {
        this.helloService = helloService;
    }

    public String hello(String name) {
        return helloService.sayHello(Objects.requireNonNull(name));
    }
}
근데 컨트롤러에서는 서비스의 구현체에 대한 코드가 없다. 단지 인터페이스(HelloService)만 명시를 했다. 그 구현체는 누가 어떻게 생성자의 매개변수로 넣어주는가?
바로 Spring Container가 해준다. 생성자에 있는 매개변수 타입을 확인 후, 현재 등록되어 있는 빈들 중 일치하는 오브젝트를 주입해준다.
Q. 컨트롤러의 생성자에 서비스가 사용되니깐, 빈의 등록도 서비스를 먼저해야하나?
A. 개발자가 빈의 등록 순서를 고려할 필요가 없다. 스프링이 똑똑하게 알아서 잘 주입해준다.
DispatcherServlet으로 전환
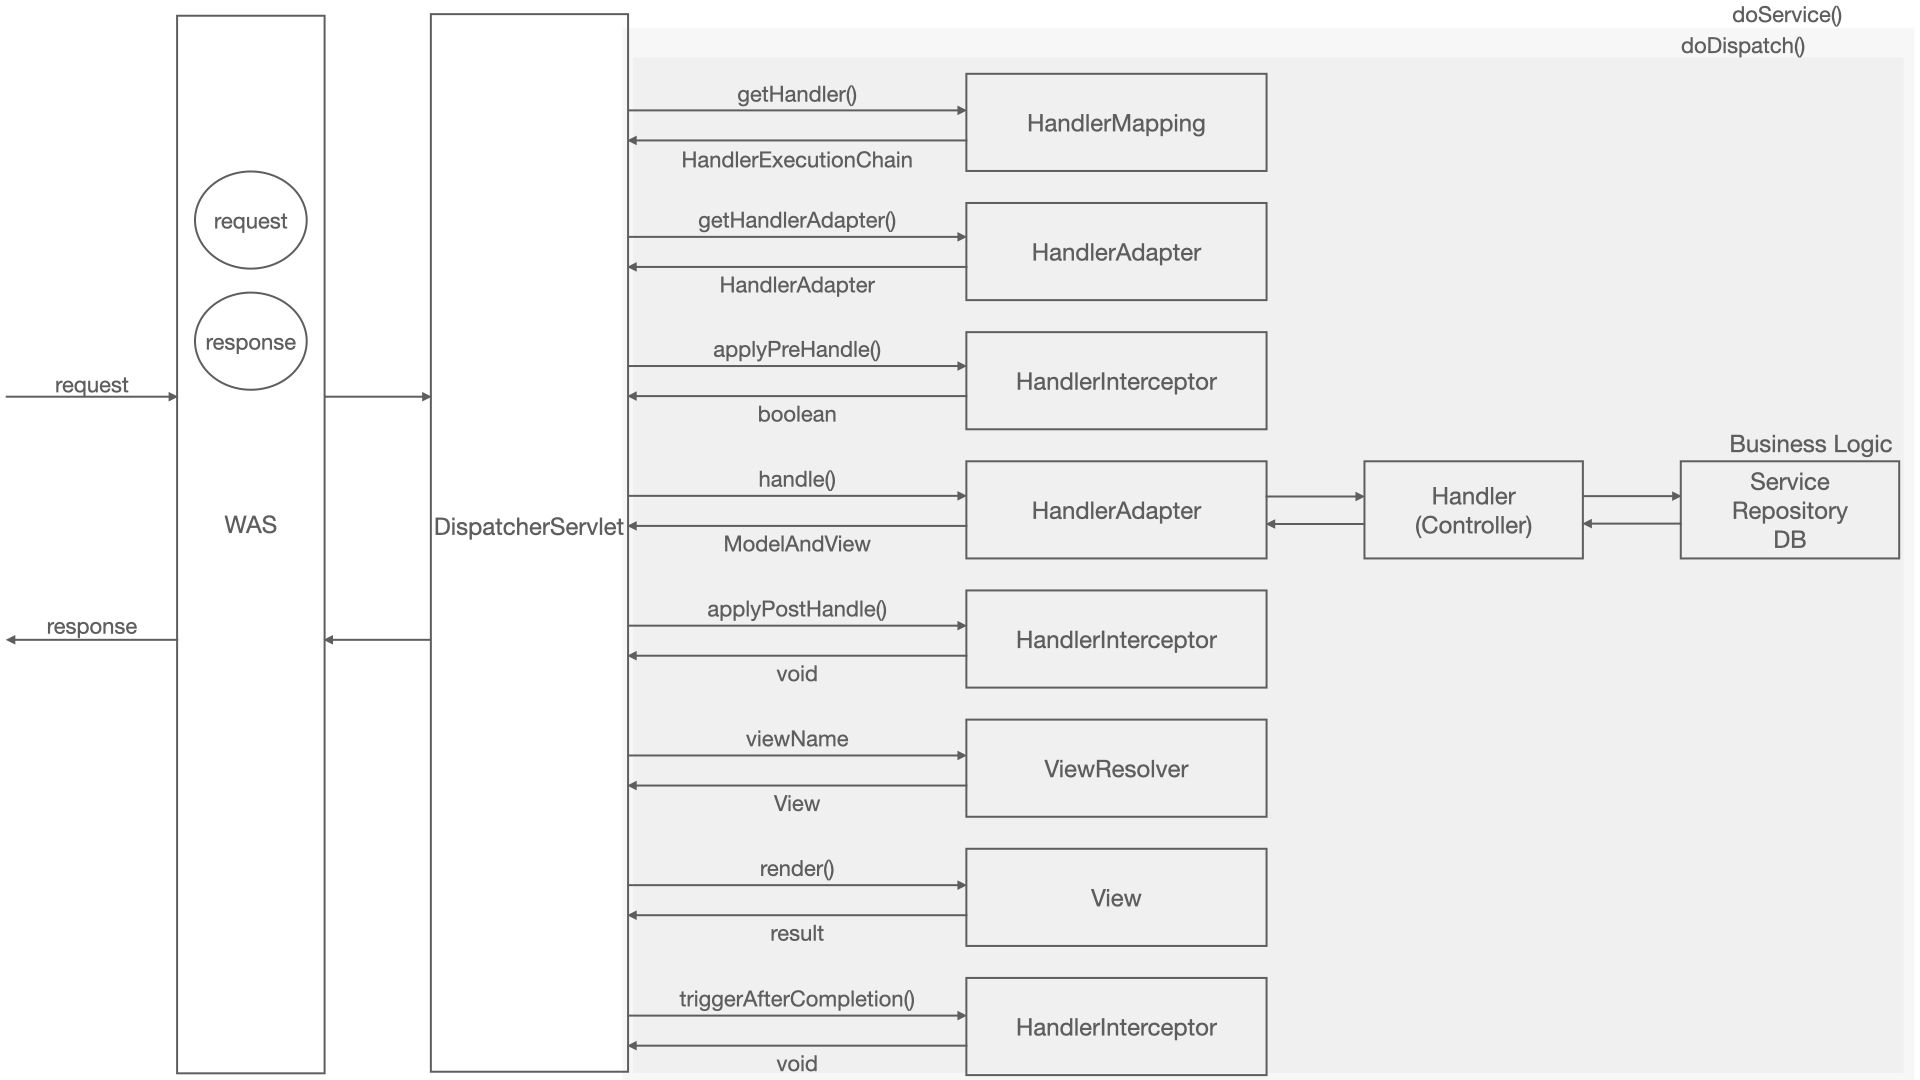
지금까지 프론트 컨트롤러를 HttpServlet를 이용하여 구현했다. 아주 간단한 기능만 넣었을 뿐인데 코드가 길고 복잡해지기 시작했다. 이런 문제를 해결하기 위해 등장한 서블릿은 HttpServlet을 상속하는 dispatcherServlet이다.
이 서블릿은 프론트 컨트롤러의 역할을 해준다. 공통 작업을 여기서 처리하고, 세부 컨트롤러로 위임하게 된다.
dispatcherServlet과 관련하여 자세한건 여기와 여기를 참고하자.
스프링 부트를 제외하고 스프링+dispathcerServlet 조합으로 애플리케이션을 만들어보자.
1
2
3
4
5
6
7
8
9
10
11
12
13
14
15
16
17
18
19
20
21
public static void main(String[] args) {
  GenericWebApplicationContext applicationContext = new GenericWebApplicationContext() {
      @Override
      protected void onRefresh() { // 스프링 컨테이너 초기화 시점에 이 메서드 실행됨
          super.onRefresh();

          // 아래는 서블릿 컨테이너와 서블릿 등록 코드
          ServletWebServerFactory serverFactory = new TomcatServletWebServerFactory();
          WebServer webServer = serverFactory.getWebServer(servletContext -> {
              servletContext.addServlet("dispatcherServlet",
                      new DispatcherServlet(this) // 서블릿과 스프링 컨테이너 연결
              ).addMapping("/*"); // 프론트 컨트롤러이므로 모든 요청 다 받음
          });
          webServer.start();
      }
  };

  applicationContext.registerBean(HelloController.class); // 빈 등록
  applicationContext.registerBean(SimpleHelloService.class); // 빈 등록
  applicationContext.refresh(); // 컨테이너 시작
}
먼저 상단에 GenericWebApplicationContext은 Spring Container이다. 우리가 HttpServlet을 이용할 때와 약간 타입이 다른데, 웹 기능이 좀 더 추가된 타입이다.
스프링 컨테이너의 초기화 시점에 dispathcerServlet 세팅이 되게 설정했다.(익명 클래스 이용) DispathcerServlet 생성 시 인자로 this를 넣어주는데, 이것은 Spring Container와 연결하기 위해서이다.
1
2
3
4
5
6
7
8
9
10
11
12
13
14
15
16
@RequestMapping
public class HelloController {

    private final HelloService helloService;

    public HelloController(HelloService helloService) {
        this.helloService = helloService;
    }

    @GetMapping("/hello")
    @ResponseBody
    public String hello(String name) {
		// 서비스 클래스 구현은 생략
        return helloService.sayHello(Objects.requireNonNull(name));
    }
}
프론트 컨트롤러의 역할을 하는 DispatcherServlet은 공동의 작업 후 컨트롤러에게 위임을 해야한다. 이때 위임할 클래스를 올바르게 찾기 위해 애노테이션을 추가해야한다.
@RequestMapping: 먼저 클래스 레벨에서 이 애노테이션이 붙은 컨트롤을 우선적으로 찾게 된다.@GetMapping: 메소드 레벨에서의 애노테이션을 찾는다.
또한 반환되는 String이 body에 들어갈 값이라는 것을 명시하기 위해 @ResponseBody을 추가해야 한다. 그렇지 않으면, DispatcherServlet은 뷰 이름으로 해석하고 뷰 템플릿을 찾으려고 하기 때문이다.
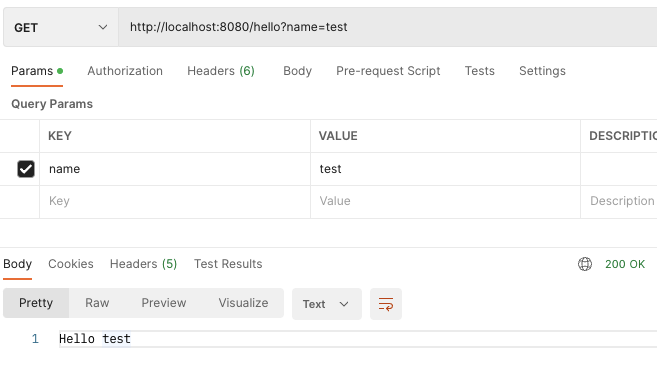
실행 후 테스트 결과, 성공적으로 응답이 되는 것을 확인할 수 있다.
@Component 이용하기
이제 코드를 스프링 부트와 유사하게 리팩토링하는 작업을 하자.
빈으로 등록할 클래스에 @Component 애노테이션을 붙여주면, 이를 스캔해서 스프링 컨테이너에 빈으로 자동 등록해준다.
먼저, 애플리케이션 메인 클래스에 @ComponentScan 을 붙여주자.
1
2
3
4
5
@Configuration
@ComponentScan // @Component가 붙은 클래스들을 모두 빈으로 등록해줘
public class HellobootApplication {
	public static void main(String[] args) {
		...
이제 빈으로 등록할 클래스에 @Component을 붙이자.
우리는 메타 애노테이션(Meta-annotaion)을 이용할 것이다. 메타 애노테이션과 합성 애노테이션(Composed-annotaion)과 관련된 자세한 정보는 여기에서 확인할 수 있다.
애노테이션이 중첩되면, 중첩된 애노테이션들의 효과를 모두 가지게 된다. 예를 들어, @RestController 애노테이션은 아래와 같다.
1
2
3
4
5
6
7
@Target(ElementType.TYPE) // 애노테이션을 적용할 타킷 지정. 클래스나 인터페이스 위에 적용한다=ElementType.TYPE
@Retention(RetentionPolicy.RUNTIME) // 이 애노테이션이 언제까지 유지?
@Documented
@Controller // 메타 애노테이션. @Controller 안에 @Component가 존재하고, 그 효과를 똑같이 갖는다.
@ResponseBody
public @interface RestController {
...
스프링에서는 이런식으로 만든 메타 애노테이션이 이미 준비되어 있다. 이를 스테레오 타입(stereotype, 전형적인) 애노테이션이라 부른다. 대표적으로 @Service, @Controller , @Repository가 있다.
Q. 그냥 @Component 만 붙이면 되지, 굳이 다른 애노테이션을 쓰는 이유가 뭘까?
A. 등록하는 빈 오브젝트가 어떤 역할을 하는지 명시하기 위해서 사용한다.
특히, 전통적인 계층형 아키텍처로 만드는 경우에 웹 계층, 서비스 계층, 데이터 엑세스 계층인지를 구분해야 하는데, 이를 애노테이션을 이용하여 표현하는 것이다.
이제 우리에게 친숙한 컨트롤러와 서비스 클래스를 작성할 수 있다.
1
2
3
4
5
6
7
8
9
10
11
12
13
14
@RestController
public class HelloController {

    private final HelloService helloService;

    public HelloController(HelloService helloService) {
        this.helloService = helloService;
    }

    @GetMapping("/hello")
    public String hello(String name) {
        return helloService.sayHello(Objects.requireNonNull(name));
    }
}
1
2
3
4
5
6
7
@Service
public class SimpleHelloService implements HelloService {
    @Override
    public String sayHello(String name) {
        return "Hello " + name;
    }
}
애플리케이션이 동작할 때 가장 먼저 실행되는 메인 메서드도 조금 수정이 필요하다.
자바 코드를 이용한 구성 정보를 사용하러면 AnnotationConfigWebApplicationContext 클래스를 스프링 컨테이너로 사용해야 한다.
1
2
3
4
5
6
7
8
9
10
11
12
13
14
15
16
17
18
19
20
21
22
23
@Configuration
@ComponentScan
public class HellobootApplication {
	public static void main(String[] args) {
    AnnotationConfigWebApplicationContext applicationContext = new AnnotationConfigWebApplicationContext() {
      @Override
      protected void onRefresh() {
        super.onRefresh();

        // 아래는 서블릿 컨테이너와 서블릿 등록 코드
        ServletWebServerFactory serverFactory = new TomcatServletWebServerFactory();
        WebServer webServer = serverFactory.getWebServer(servletContext -> {
            servletContext.addServlet("dispatcherServlet",
                    new DispatcherServlet(this) // 서블릿과 스프링 컨테이너 연결
            ).addMapping("/*"); // 프론트 컨트롤러이므로 모든 요청 다 받음
        });
        webServer.start();
      }
    };
    applicationContext.register(HellobootApplication.class);
    applicationContext.refresh();
  }
}
@Bean 이용하기
이제 우리가 직접 생성한 controller와 service는 컴포넌트 스캔을 이용하여 빈으로 등록했다.
하지만 아직 우리가 아직 빈으로 등록하지 않고 직접 생성해서 사용하는게 2개 있다.
위 main 메서드에서 확인할 수 있는데, ServletWebServerFactory와 DispatcherServlet 이다.
이번에는 이 2개의 오브젝트도 스프링의 빈으로 등록해서 스프링 컨테이너가 관리하도록 해보자.
1
2
3
4
5
6
7
8
9
10
11
12
13
14
15
16
17
18
19
20
21
22
23
24
25
26
27
28
29
30
31
32
33
@Configuration
@ComponentScan
public class HellobootApplication {
  @Bean
  public ServletWebServerFactory servletWebServerFactory() {
      return new TomcatServletWebServerFactory();
  }

  @Bean
  public DispatcherServlet dispatcherServlet() {
      return new DispatcherServlet();
  }

  public static void main(String[] args) {
      AnnotationConfigWebApplicationContext applicationContext = new AnnotationConfigWebApplicationContext() {
        @Override
        protected void onRefresh() {
            super.onRefresh();

            ServletWebServerFactory serverFactory = this.getBean(ServletWebServerFactory.class);
            DispatcherServlet dispatcherServlet = this.getBean(DispatcherServlet.class);

            WebServer webServer = serverFactory.getWebServer(servletContext -> {
                servletContext.addServlet("dispatcherServlet", dispatcherServlet)
                        .addMapping("/*");
            });
            webServer.start();
        }
      };
      applicationContext.register(HellobootApplication.class);
      applicationContext.refresh();
  }
}
최종 리펙토링
main 클래스에 있는 로직들을 별도의 클래스로 분리하자.
1
2
3
4
5
6
7
8
9
10
11
12
13
14
15
16
17
18
19
20
21
public class MySpringApplication { // 클래스 분리
  public static void run(Class<?> applicationClass, String... args) {
    AnnotationConfigWebApplicationContext applicationContext = new AnnotationConfigWebApplicationContext() {
      @Override
      protected void onRefresh() {
        super.onRefresh();

        ServletWebServerFactory serverFactory = this.getBean(ServletWebServerFactory.class);
        DispatcherServlet dispatcherServlet = this.getBean(DispatcherServlet.class);

        WebServer webServer = serverFactory.getWebServer(servletContext -> {
            servletContext.addServlet("dispatcherServlet", dispatcherServlet)
                          .addMapping("/*");
        });
        webServer.start();
      }
    };
    applicationContext.register(applicationClass);
    applicationContext.refresh();
  }
}
메타 애노테이션과 합성 애노테이션을 이용하여 클래스 애노테이션을 만들자.
1
2
3
4
5
6
@Target(ElementType.TYPE)
@Retention(RetentionPolicy.RUNTIME)
@Configuration
@ComponentScan
public @interface MySpringBootApplication {
}
빈을 등록할 클래스를 따로 분리하자.
1
2
3
4
5
6
7
8
9
10
11
12
@Configuration
public class Config {
    @Bean
    public ServletWebServerFactory servletWebServerFactory() {
        return new TomcatServletWebServerFactory();
    }

    @Bean
    public DispatcherServlet dispatcherServlet() {
        return new DispatcherServlet();
    }
}
최종 main 클래스의 모습은 아래와 같다.
1
2
3
4
5
6
7
8
@MySpringBootApplication
public class HellobootApplication {

    public static void main(String[] args) {
        MySpringApplication.run(HellobootApplication.class, args);
    }

}
뭔가 우리에게 익숙한 모양이 나타났다. 스프링 부트의 main() 메소드가 있는 클래스와 유사한 코드를 만들었다. MySpringApplication을 SpringApplication로 바꾸어도 동일하게 동작한다.
물론 기능적으로는 약간 다르긴 하다. 스프링 부트와 동일한 방식의 코드를 만들려면 추가적인 작업이 필요하다. 이는 나중 게시물에서 조금씩 바꿔보자.
Reference
해당 게시물은 인프런 - 토비의 스프링 부트 이해와 원리을 기반으로 작성되었습니다.

